Posted on Sep 22, 2026
How to Illustrate a Children's Book: An 8-Step Guide

Irene Silvino
Irene Silvino is a London-based picture book illustrator, designer, and art director. She has illustrated books for independent authors and traditional publishers alike. She is also an art director at Serinidy Press and runs Bibitibop, her illustration and design agency.
View profile →There is something wonderfully exciting about taking a few pages of words and turning them into an entire little world.
I've worked as an illustrator for many years, bringing picture books to life for independent authors and traditional publishers alike. I've worked on titles including Little Critters, Big Feelings, Sarah the Spectacular Squirrel, and The Chubby Bubbies: Trip to the Museum. I'm also currently an art director at Serinidy Press and run my own illustration design agency.
In this post, I’ll walk you through how I turn a manuscript into a finished, print-ready picture book — using several upcoming books I’ve illustrated as case studies.
Hire a pro illustrator

Florian G.
Middle-grade series specialist creating bold, colorful designs. Delivering a professional, efficient, and collaborative experience.
Request a quote


Nataliia K.
Versatile 2D Artist & Children's Book Illustrator based in the UK. 6+ years experience, expert in Procreate & Adobe tools.
Request a quote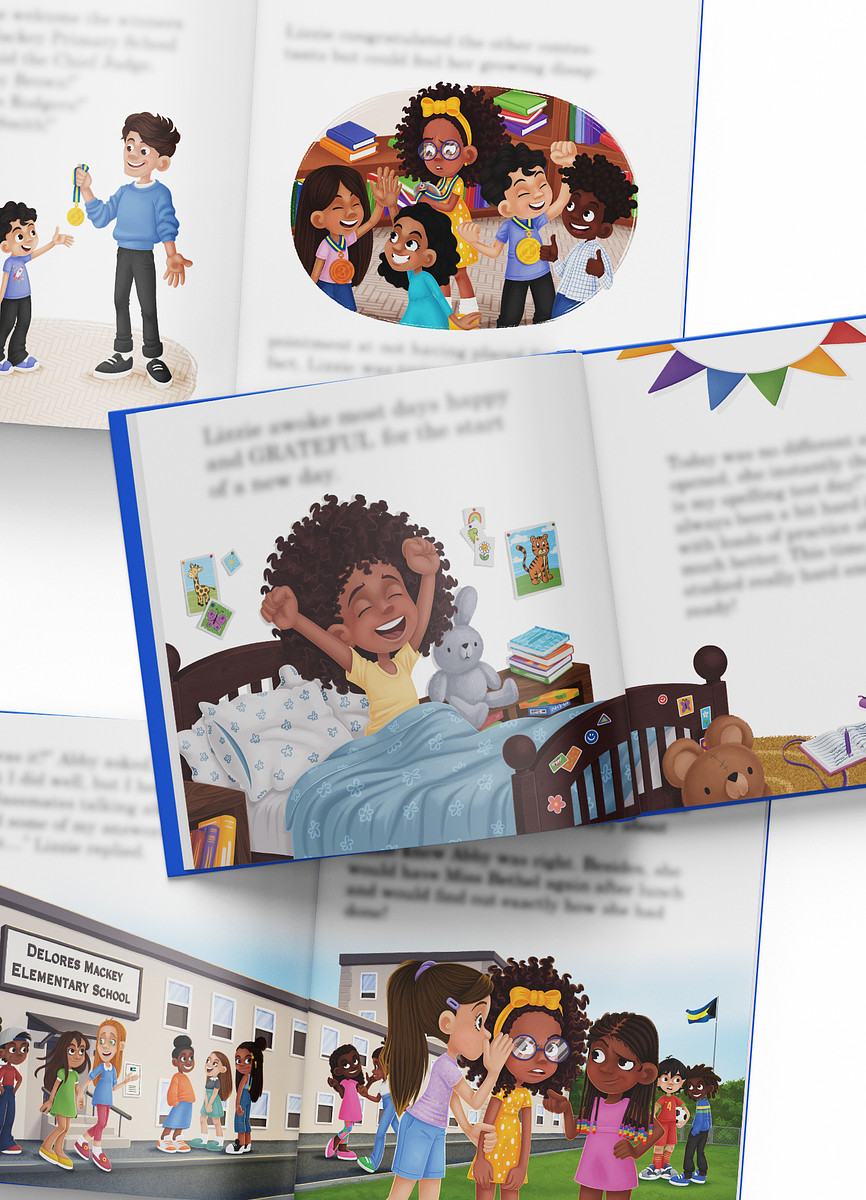

Driss C.
Award-winning illustrator who believes in colourful designs for all genres.
Request a quote


1. Map out the story and page turns
The first thing I do is read the manuscript closely and analyze how the story unfolds. Where are the funny moments? Where should the reader pause? Where can we create a little surprise?
My job isn’t simply to divide the manuscript into pages, but to use each page turn as part of the storytelling.
Sometimes, I’ll suggest small changes — perhaps shortening a passage or moving a sentence to improve the pacing. This is where the collaboration with the author really begins.
A standard picture book often has 32 pages, with around 28–30 available for the story once you account for front and back matter, such as the title, dedication, and copyright pages. Many picture books for children aged 3–5 also fall somewhere around 300–600 words. Once I know how much space we have to work with, I start mapping the story across the remaining spreads.
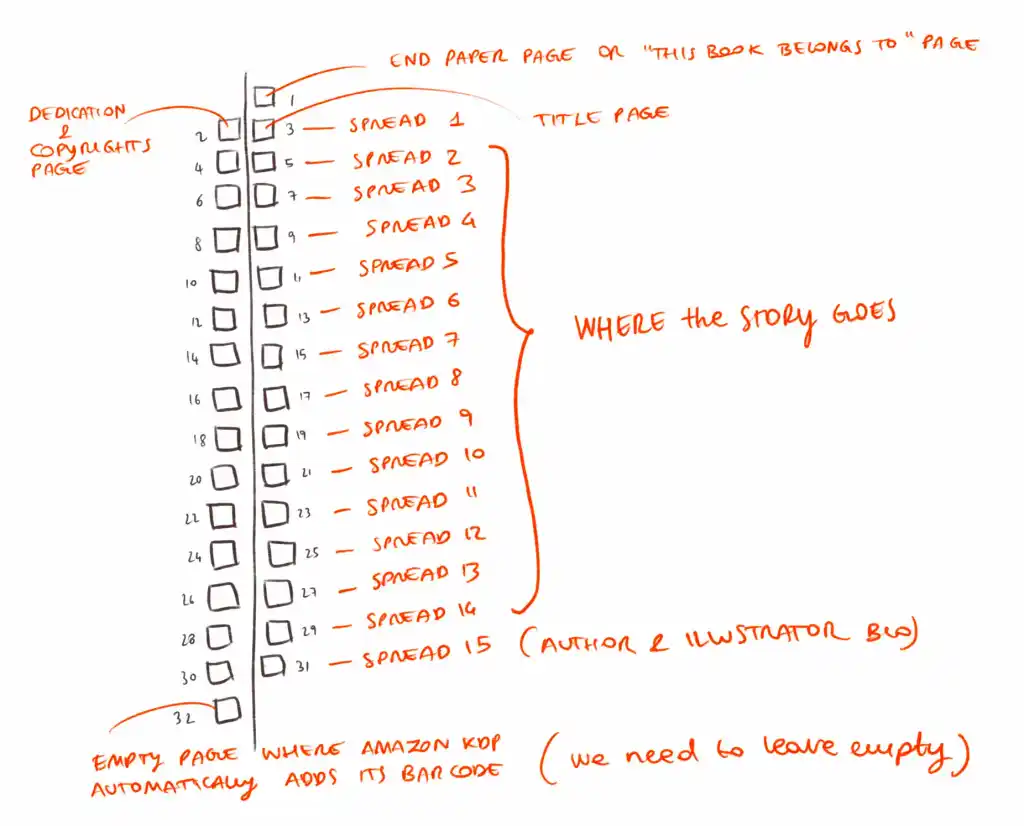
Alongside the manuscript, I also ask the author for any illustration ideas, references, or visual inspiration they already have. I'm very open at this stage. I actually love hearing what authors have imagined in their heads — even if we eventually take the idea somewhere completely different.
Spending more time discussing the book upfront often saves a lot of revision later.
Then, finally, I get to start drawing.
Q: How do you collaborate with authors to ensure your illustrations align with their vision?
Suggested answer
It's important to remember that every author is different. Even if an author has worked on their book for months, if not years, and has a deep understanding of places, characters and content, it doesn't always mean they know how it should look. Other times the author knows exactly what they want.
Often an author has prepared visual references and described their project in detail in their proposal. But others can be less sure. Either way, I will want to pick their brains and try and get as much information and hopefully relevant picture references from them as possible. This could be other illustrations, art or books they like, but also experiences and situations that have inspired the book that they think are relevant. I may also suggest some references here if I think it can help. If the author is unsure at the start, then this process will help them find a visual idea that we can build upon.
Then the next stage is to find a coherent look and style from this material that can work for the project. To do this I will narrow down the references to find a core idea by making a number of sketches and mockups of characters or scenes with references for colours, lines, light or textures that we can discuss. It's good to give this phase a little extra time to ensure we both understand what I am aiming for in the visuals. It may take a couple of variations but hopefully we can agree on a look that we are both happy with. I want to make illustrations that match their vision but also need to be sure it's a look that I am comfortable making that's not too far from my personal style.
After this, and if its a bigger project with many illustrations, then it can be a good idea to choose a 'typical' scene from the book and make a single, finished illustration for approval that can be a style reference for all the rest.
Even if we both agree on the visuals, it's still important to me that the author can follow the progress throughout the rest of the project to avoid any problems or disappointment at the end. This doesn't mean the author has to give a critique of everything I make, but it's good to confirm my work feels right for them and see if there are details that they want to change.
In short its a process of respect, understanding and guidance from both parties that leads to a successful visual interpretation.
Ben is available to hire on Reedsy

I like to keep the process really collaborative. Early on, I share concept art and encourage plenty of back-and-forth so we can make sure the illustrations match the author’s vision. For picture books especially, I ask for lots of detail about the scenes and characters — the more I know, the closer I can get to what the writer imagined.
Of course, I add my own artistic touch, but the best results always come from that open communication throughout the project.
Paul is available to hire on Reedsy

When an Author sends me their text, my first step is to produce a written visual layout on their text. So for each page I will write in red my idea for the page or spread. This is solely for me to begin researching any reference I need and collect this into a folder to refer to later.
I will then produce a rough layout of each page, very loose, quick sketches to convey the action and composition of the scene, I will do this for the whole book. Then all the text and rough sketches go into a PDF which is sent to the author for notes. This way, we can agree overall composition, make sure it flows well etc, but also, we can make changes easily. So when I move into producing the final artwork, we are both as prepared as can be. There will inevitably be further changes for the final art but this way, they tend to be minimal. It's about setting the ground work early on so the client knows what to expect.
Rich is available to hire on Reedsy
2. Develop the main character(s)
Once I understand the story and its rhythm, I begin developing the characters. I sketch them in Procreate on my iPad — a tool I love because it lets me draw almost anywhere.
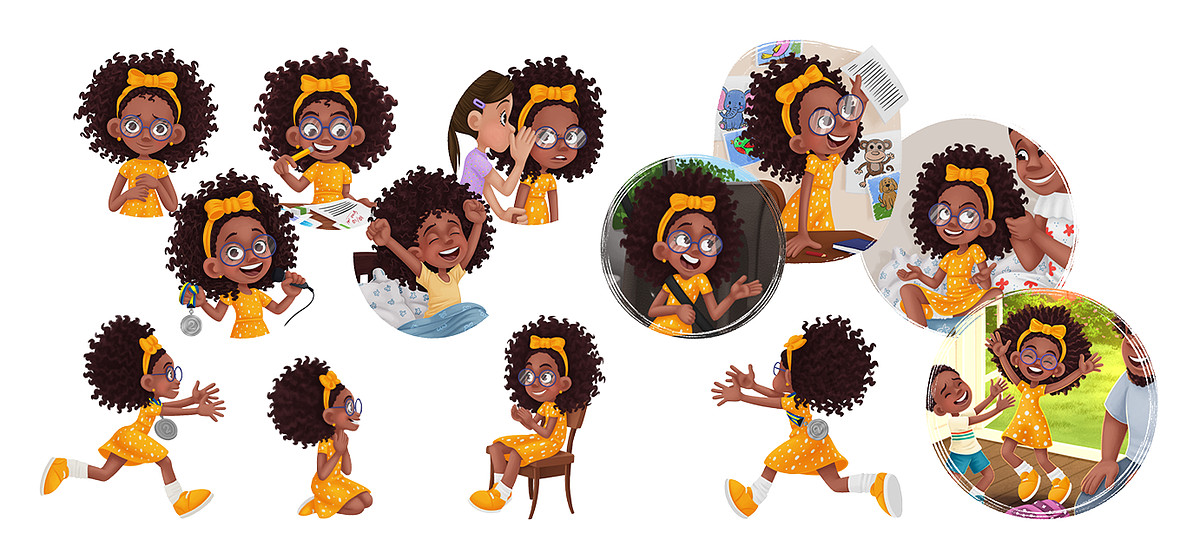
I sketch the main character (or characters) in different poses and expressions, exploring how they move and express different emotions, from excitement and delight to confusion, worry, and anger. This is key because a character needs to feel like a character, not a sticker that we simply place on different pages.
I always ask authors for ideas or references. For one project, the main character was based on the author’s own dog, Buster, which helped me to give him instant personality and, of course, bring a piece of her real life into the story.
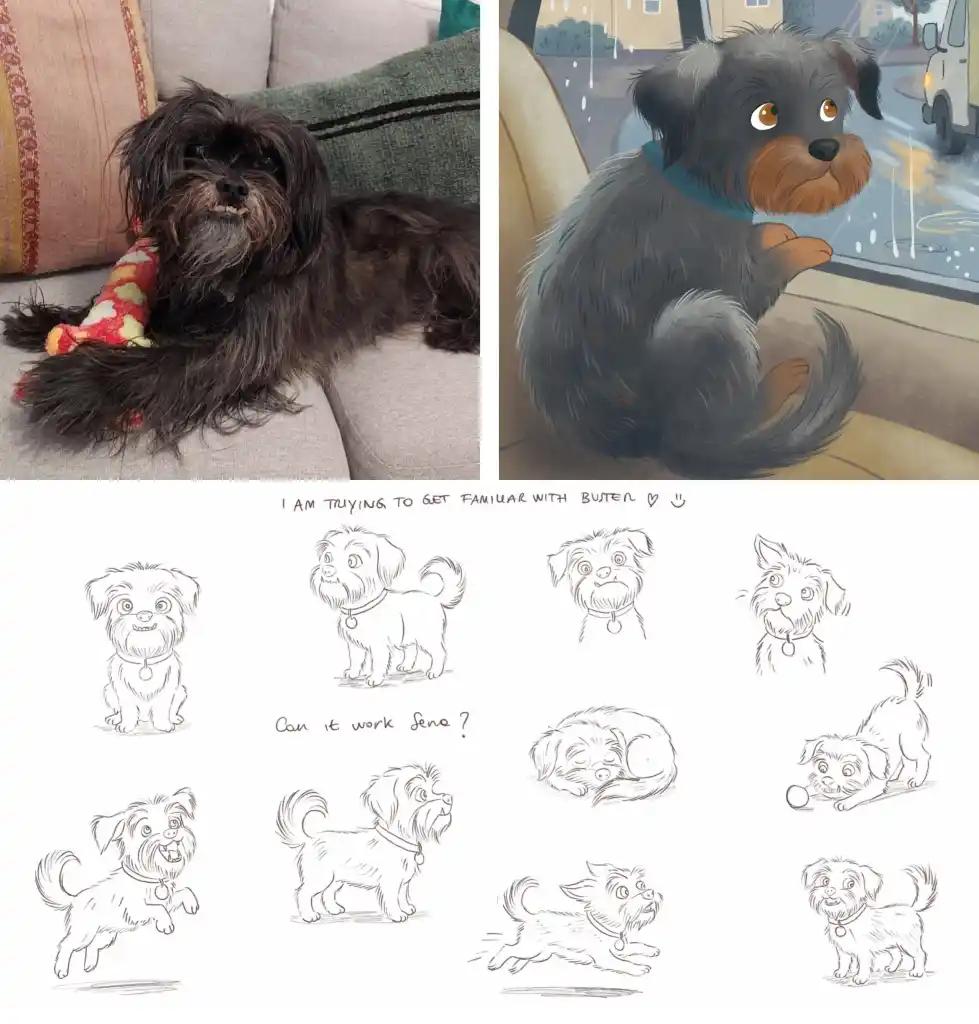
Once the client approves the characters, I move on to the storyboard.
3. Build and sketch the storyboard
The storyboard is where I create a rough version of the entire book, page by page. It’s not meant to be pretty, but simply help us see the whole story on paper.
I’m mainly working out composition, pacing, and where the reader’s eye should go. Sometimes I'll deliberately hold something back so that the reader has to turn the page to discover it. Other times, a big moment deserves a dramatic two-page spread.
This is one of my favourite parts of the process because this is where a manuscript starts becoming a book.
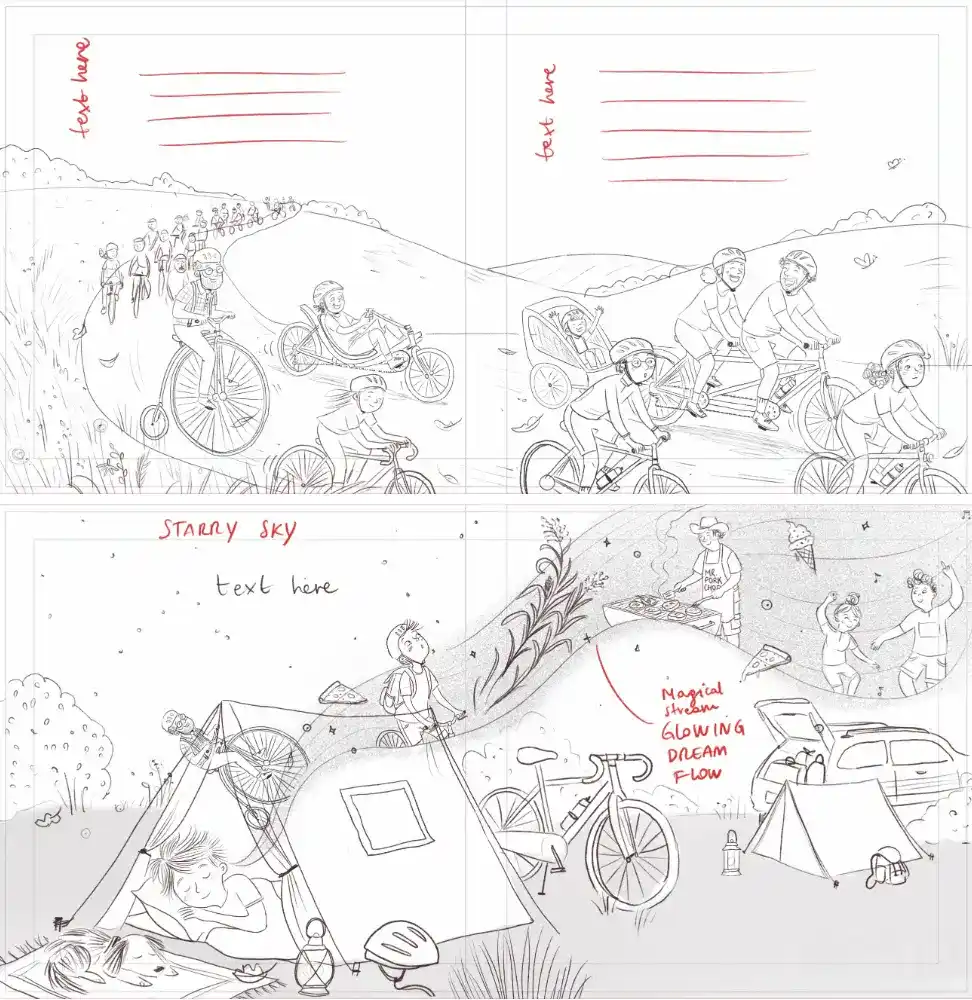
At this stage, I usually offer clients two rounds of revisions. Together, we review pacing, composition, page turns, character continuity, text placement, and other key details before I begin the final artwork.
Some authors prefer to review a loose storyboard for the entire book, while others like to work through it spread by spread. I adapt the process to suit each project and client.
When the storyboard is finalized, we can move confidently into color.
4. Use color to shape the mood and emotion
Color is much more than decoration. It tells us how a character feels before we’ve even read the words. It can make a place feel warm and safe, cold and lonely, exciting and energetic, or mysterious and magical.
Look at this illustration for A Scratch at the Door. Buster is feeling blue because he's moving to a new house — and so is the color palette around him. In the next illustration, he’s still a little unsure (reflected in the grandparent’s blue jeans). But the house is warm, and his grandparents are sitting happily in their armchairs, surrounded by soft oranges and yellows.
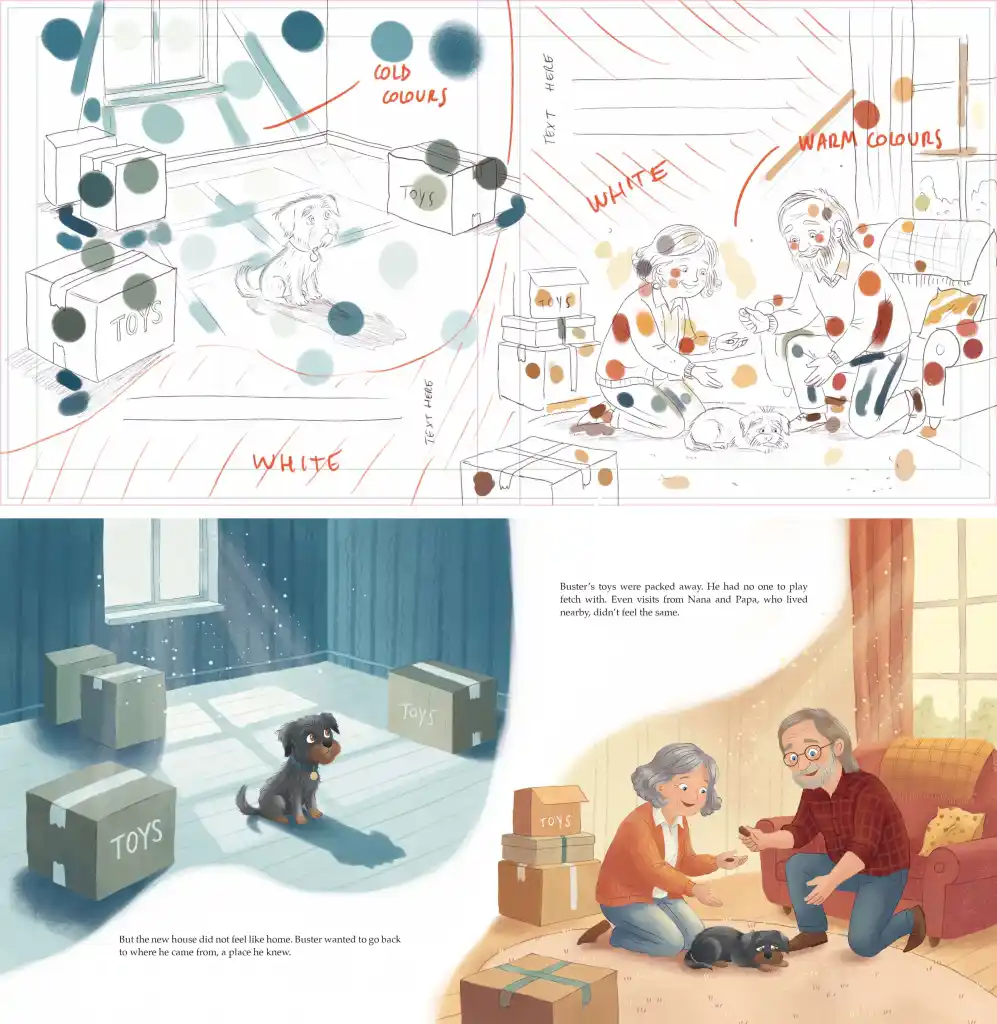
Without saying it outright, the colors are already telling us something: this place may feel strange now, but it’s safe. Soon, it will feel like home. That’s the kind of visual storytelling I love to bring out for authors.
Before I start coloring, I'll ask the author whether they already have a particular palette or mood in mind. If they don't, I will develop one based on the story and characters.
Then I pick some of my favourite brushes and start coloring. Over the years, I've collected many brushes, each with its own particular quality — a soft glowing effect for light on water, a grainy finish for grass, different pencils and textures for different surfaces.
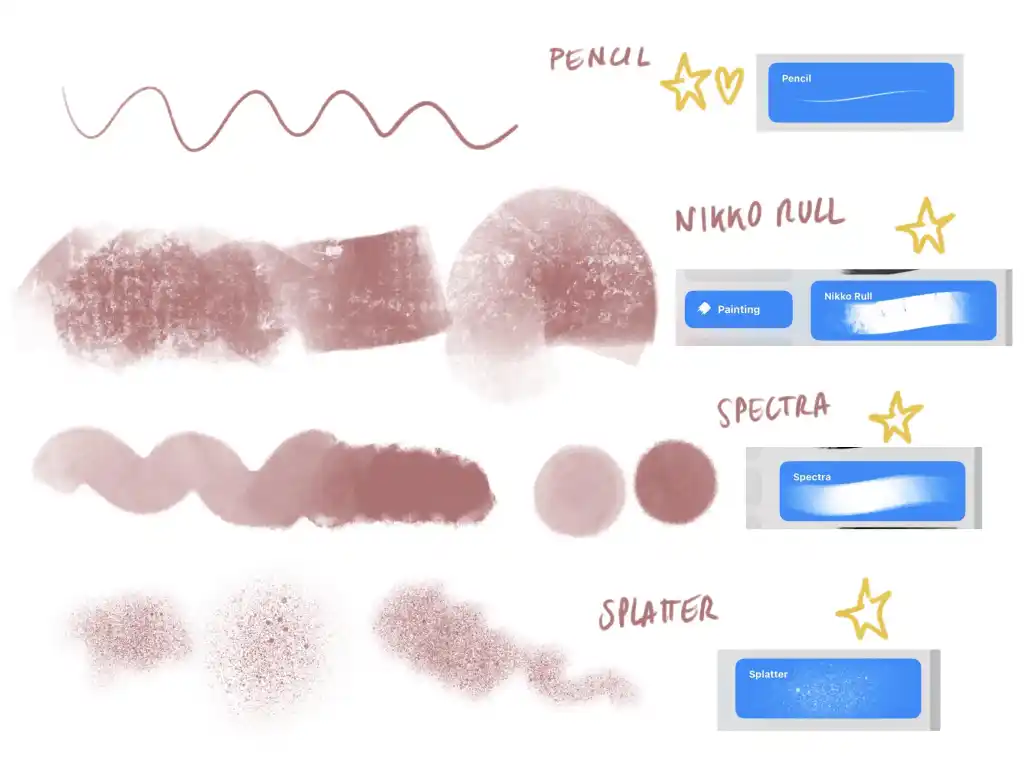
Coloring generally takes considerably longer than sketching. But when it’s done, the book really starts to come together.
Next, I bring the words back in.
Q: Where do you go to for inspiration on illustration projects?
Suggested answer

The manuscript serves as my primary source of inspiration. The characters, locations, and plot all influence the choices I make as an illustrator. A story filled with fun might suggest the use of bright colors, while a narrative centered on loss or grief may require soft, muted tones. If the setting is a jungle, a green palette would be fitting, whereas a story set in the city might demand tall buildings.
As I read through each manuscript, I take notes. My vision for the illustrations is shaped by my personal experiences. As a children's book illustrator, I tap into my childhood memories to visualize each page, which may differ from the author's own experiences. This is where the author’s vision and my vision as an illustrator merge, creating something greater than ourselves.
At some point, I have to sit down and start working. For instance, if the story is about a child dreaming of flying to the moon, I’ll explore various picture books on similar themes. I examine the colors they use and how they represent space and rocket ships. If you don’t have an extensive picture book library, you can visit websites that showcase other illustrators’ work. When I first began, I maintained a large library of reference material, tearing out images from magazines and organizing them in folders within a filing cabinet. This has since evolved to using Google image searches. Recently, I've relied less on Google as more search results are AI-generated.
Many artists find inspiration by keeping sketchbooks, they sit in a park to sketch what they see each day. This practice sharpens your observational skills, which you then bring into your illustrations.
Ultimately, artists are great collectors. We examine the work of other illustrators, observe the world around us, and repurpose those images into something new.
What inspires me may not inspire you. I know illustrators who find motivation in art galleries or through travel. Personally, I enjoy watching movies and taking note of how directors frame their scenes. Illustrating a picture book is much like storyboarding a movie, so I pay attention to the different camera angles they use and consider how I can apply that knowledge to my next project.
I hope this helps
Vaughan
Vaughan is available to hire on Reedsy

My inspiration comes from a diverse range of sources that extend far beyond the publishing world. While I regularly study current book cover trends on platforms like Goodreads and Amazon, I also draw inspiration from classical art, contemporary photography, film posters, and even fashion design. This broad approach helps me bring fresh perspectives to book illustration.
I maintain an extensive digital library of visual references, regularly updating it with screenshots of interesting designs, color combinations, and compositional ideas. Social media platforms like Pinterest, Instagram, and ArtStation provide continuous inspiration, while also helping me stay current with emerging design trends and techniques.
Most importantly, I find inspiration in the stories themselves. Each manuscript provides unique opportunities for visual interpretation, and I often find that deeply understanding the author's narrative leads to the most innovative and effective cover designs.
Sergey is available to hire on Reedsy
I find resources such as Pintrest to be hugely helpful. I can file away reference and inspiration in folders relevant to each project. I also use googledrive to save images and screenshots from things I see. I also keep an extensive photo library from my travels.
My main expertise is Picture Books, So I keep a large collection (shared with my four year old) of books and refer to them often. This is a good way to learn how to make a picture book but I have to emphasise, not to copy, just for things such as composition ideas, how to use light and dark, how to place text etc, the technical stuff. As an Illustrator of many years, I have confidence to draw almost anything, this comes from experience, I know how to draw a subject, how to frame that across 28 pages is the tricky (but fun) part.
Rich is available to hire on Reedsy
5. Bring the words and pictures together
Once the artwork is colored, I place the manuscript text into each spread and start refining how the words and images work together.
I usually ask the author early on whether they have a particular font in mind. If not, I recommend something simple and easy to read. Picture books are often read aloud by adults, but many young readers are also beginning to recognize and read words themselves. Good typography needs to work for both.
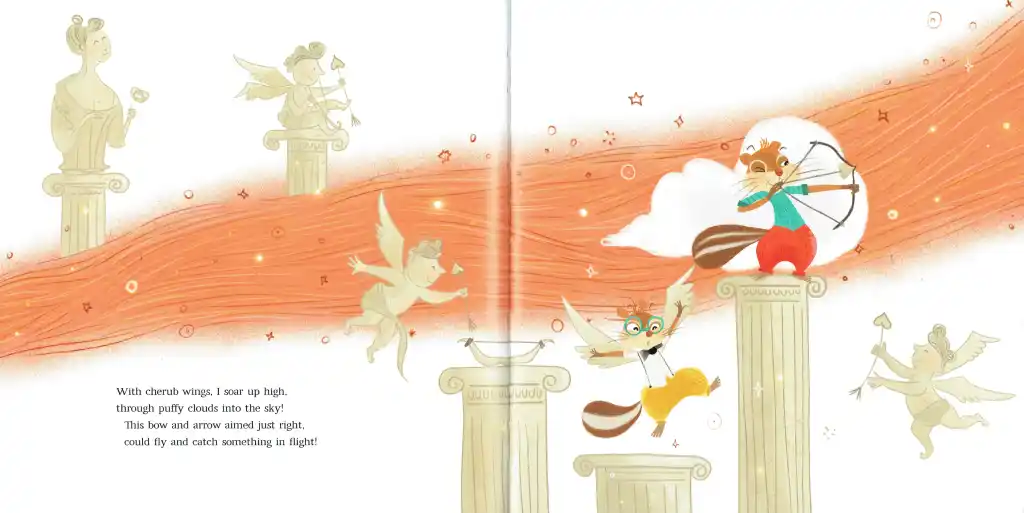
At the same time, “easy to read” doesn’t have to mean boring. If the story contains a word like “SPLASH!”, for example, I might give it more movement or energy, turning the typography into part of the illustration itself.
And then comes the part nobody can escape: revisions!
6. Revise the book for consistency and continuity
Revision is where I go through the book again and again, checking everything from the overall storytelling down to the tiniest details.
Is the character's expression right for the scene? Does the character look the same from spread to spread? Is the text sitting comfortably? Does the color palette flow through the book?
When you're creating a whole book, consistency is incredibly important. The reader might not consciously notice that a character’s tail has one stripe on one page and two on the next — but something will feel wrong.
Once everything is working beautifully across the pages, the illustrations are ready for production. But not before creating the all-important book cover.
7. Design the book cover
The cover has a big job to do. It needs to catch someone's attention, communicate something about the story and make them curious enough to pick up the book.
I usually design the cover last. By then, I know the characters, emotional journey, key moments, and overall personality of the book well enough to recognize the image that best captures it.
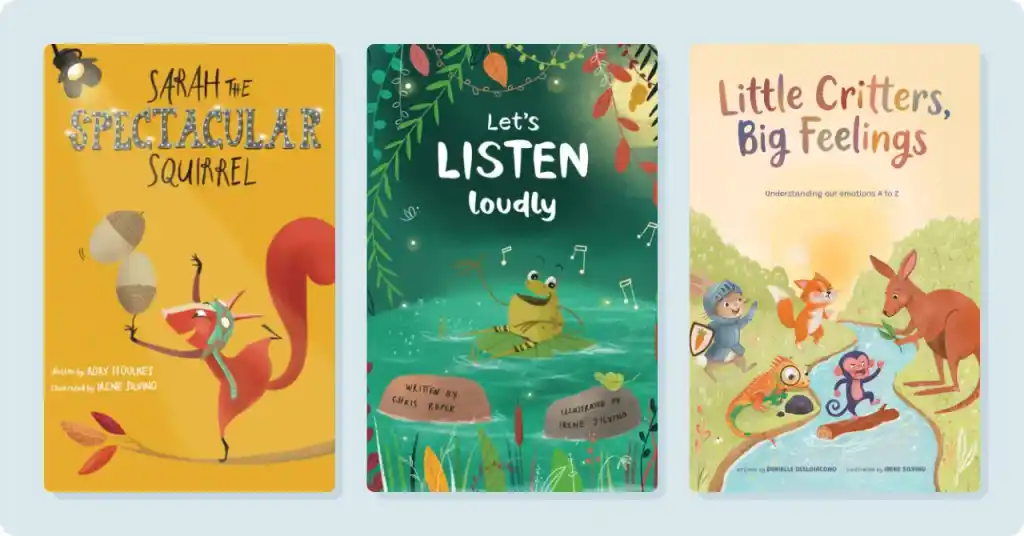
That said, I'm flexible about when I design it. Some authors need their cover much earlier because they're preparing marketing materials, pre-orders or a publishing campaign. In those cases, we'll bring the cover forward in the process.
8. Prepare the files for printing and publication
Finally, I prepare high-resolution, print-ready files based on where and how the author plans to publish. In Photoshop, I work from templates with the correct trim size, margins, bleed, and print areas, then export the finished interior and cover PDFs.
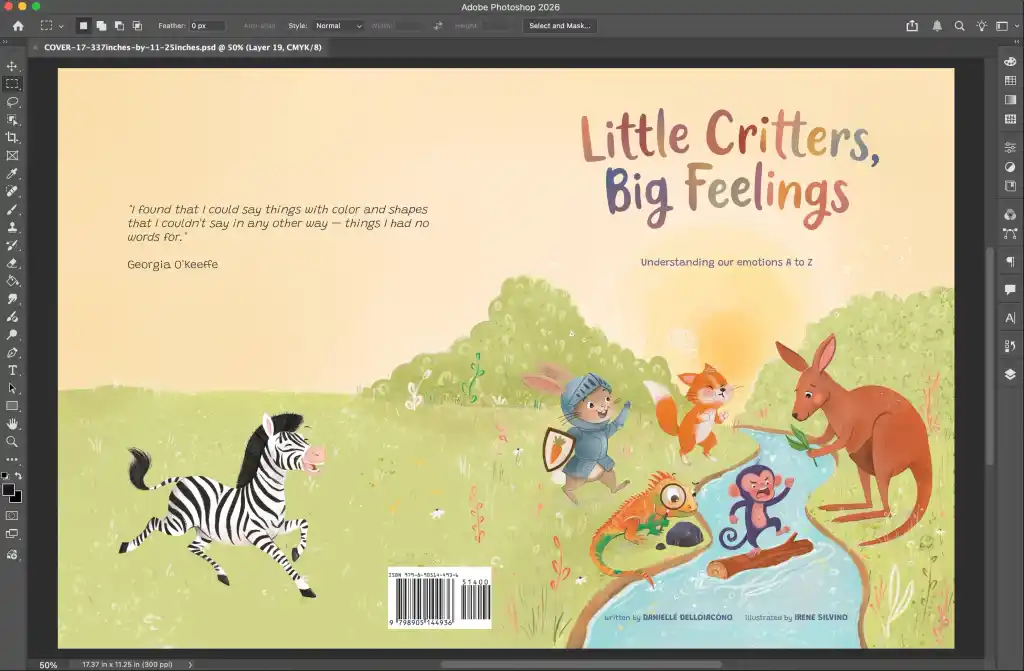
This is also where I help authors navigate some of the more technical decisions involved in publishing their book. Should they choose paperback or hardcover? Matte or glossy? Amazon KDP or IngramSpark?
These might not be the most glamorous questions, but they are important ones.
I'll also advise on things like ISBNs and barcode requirements, including whether the book price should be encoded in the barcode. If needed, I can create the barcode as part of the production process too. (Note: not every illustrator offers this production support.)
At this point, my part is done, while the author's publishing journey begins.
Q: How did you develop your personal illustration style as a children's book illustrator, and how has it evolved over time?
Suggested answer
The question of style in Illustration is always a tricky one. Is it best to have a range of styles, or just one? Do I adjust my style to reflect trends in Illustration? Personally, my style today developed from years of experimentation. I started with fine art in sixth form, hand drawn realistic style work, then moved to print making in college and then a mix of both in early university years before combining hand drawn, painted and printed elements with digital techniques.
I would scan in scraps from the print room floor and mix this with scanned drawings to create a kind of digital collage. From there this process has evolved to be all digital. My work still maintains a painterly feel and is still all drawn and painted by hand, just using a digital paintbrush. With so much AI art around, it's important to maintain a personal style, one that's distinct to you. This really helps sell books for authors on Amazon, there are so many AI generated books for sale and they all look the same.
Rich is available to hire on Reedsy

For me, I think my style was heavily influenced by a lot of my favorite media as a child. The cartoons I watched, the pictures book I read over and over, and my favorite comics all seemed to mesh together in my mind and informed the art I create today.
I think it's evolved partially because, as I age, I gain new experiences and influences. But the greater evolution has just been years of drawing everyday and honing my skills. Learning what works and doesn't work for the art I want to create!
Courtney is available to hire on Reedsy

My style has developed after lots of consistent drawing. Experimenting is so important and it’s really useful to know what doesn’t fit as well as what does. My style is still evolving and will continue to do so as I push to improve and become more refined.
Tommy is available to hire on Reedsy
A picture book is something you build together
The entire process can take weeks or months, and every project is different. But what I love most is how collaborative it is.
Illustrating a picture book is about much more than translating an author’s words into pretty images. I like to get inside the story — asking questions, brainstorming possibilities, moving things around, and finding those moments where words and pictures create something neither could achieve alone.
You’re building a world that didn’t exist before, together. That’s probably why I become so attached to the authors I work with: I get to cheer when the book arrives, celebrate when they hold it for the first time and, quite often, start imagining the next one together.